Tuesday, October 5, 2010

Pistachio Macarons

The other day I accidentally bought 4 pounds of pistachios at Costco.  Eric needs to feed me before taking me shopping.  What's a girl to do with 4 pounds of pistachios?  The obvious answer may be pistachio ice cream, but my mind went straight to pistachio macarons. 

Macarons are delicious and fun to make, however they do take a fair amount of time, preparation, planning and technique.  Your egg whites need to be at room temperature (like, left-out-overnight-room temperature), as does your butter.  The pistachios I bought were normal, salted in the shell pistachios, so Eric and I spent the better part of the "new" "Star Trek" shelling them.  I then had to rinse them off and dry them.  They still didn't dry quite right so I toasted them for about 5 minutes as the oven was preheating.  Then I had to let them cool.  That doesn't include other resting and cooling periods required for the baking process.

Pistachio Macarons


Ingredients


For the Shells:
1 1/4 Cups Confectioner's Sugar
4 oz Pistachios
1/4 Cup + 2 Tbs Egg Whites AT ROOM TEMPERATURE
1/4 Cup Granulated Sugar
Pinch of Salt

For the Filling:
1 1/2 oz Pistachios
1 Cup Confectioner's Sugar
6 Tbs Butter, softened
1/2 tsp Vanilla

Directions

The Shells:
Process the pistachios with the powdered sugar in a food processor until you get a fine pistachio flour.  Make sure you process it in phases, mixing and breaking up the bottom layer in between.


Hand mix the egg whites, salt and granulated sugar.  If you are going to add food coloring (powdered only), do it here. 

Whip until medium to stiff peaks form.

Sieve the pistachio flour and hand fold it into the egg white mixture, being careful not to over mix.


Spoon batter into a piping bag with a large, round tip (I think it's a #806).

Pipe batter into 1" circles onto baking sheets lined with silpat.  If you don't have a silpat you can use parchment paper.

Rap each baking sheet hard on the counter a few times to get rid of air bubbles and let rest for around 45 minutes, until the macarons develop thin skin.

Bake for 10 minutes.  They are done when you can wiggle the top of one a little, and it doesn't loose it's shape. 

Cool completely before removing from the Silpat.  Getting too antsy may result in this:

On the left, a nice smooth bottom.  On the right, excess air bubbles and removing the shells before completely cooling left me with shells not fit for macarons, but fit for tasting.


For the Filling:
process the Pistachios and confectioner's sugar like you did for the macaroon batter.  Cream the softened butter with the confectioner sugar mixture.  Add vanilla and food coloring.

Make Macarons:
Pair similar sized shells and glue them together with some pistachio filling. 

I used Nutella for some because the filling was so sweet (paired with some already sweet shells).  Also because I believe there are few things Nutella can't improve.  I recommend using a piping bag again.  If you are going use a knife make sure you are VERY gentle or you will crush the bottom part of the shell.


They actually get better over the next day or so if you can wait.

Friday, October 1, 2010

For a Good Time, Call Fran: 21-15-9

We did Fran yesterday. 

Fran is a benchmark CrossFit WOD. 

21 Thrusters
21 Pullups
15 Thrusters
15 Pullups
9 Thrusters
9 Pullups

Usually written as:
21-15-9
Thrusters
Pullups

It's probably the most widely known WOD and is part of the vernacular.  You know you're part of the cult when some one asks "What's your Fran time" and you know the answer.

Oh, wait, you have no clue what I'm talking about?  Well here is a classic Fran video for your pleasure.  (I may call shenanigans on some of the form, but, hey, it's a classic.)


The thing about Fran is that the whole thing is intense and both movements take full body participation.  Thrusters are a front squat to a press.  I can't think of any muscle group you  don't use in a thruster.  In CrossFit, we generally do kipping or butterfly pullups - both of these involve using your entire body to generate upward momentum and to maintain intensity during the workout.

It was relatively brutal as usual.  Although I helped myself out a little this time.  I actually warmed up a little which limited my Fran cough to about an hour and kept me moving pretty smoothly through the first part of the WOD.  "Fran cough" is a term we gave to the burning throat and lung feeling and the accompanying cough that comes after Fran (or any short, high intensity workout).  Some blame this on a short, mild case of pulmonary edema, but I'm not a doctor and barely even know what that means.

Anyway, I did my 21 thrusters without breaking and didn't break my pullups until 11 (and I continued to do more than half in the first set every round).  I attribute this partly to much slower, more deliberate, more careful pullups since recovering from tendinitis in both shoulders.  My time was about 30 seconds off my max.  Next time I need to break through my mental barrier, take shorter breathers, push through the 15 thrusters in one set and do it on solid ground (rather than the mats we have in the gym now).  Hopefully I can go into it with less of a case of Fran tummy (another "Fran" term, this one I don't want to discuss but involves the nervousness finding out you have to do Fran invokes).  I have a plan of action!  Let's see if I can make it happen!

Thursday, September 30, 2010

Chicken Roll-Up Dinner

I'm moving away from Asian this week into something that feels truly American.  How much more American can you get than mashed potatoes, broccoli, steak, chicken and cheese (we'll ignore the Panko for now).  Eating this felt pretty decedent and not very healthy at all, but since it has broccoli I'm going to go ahead and consider it a healthy meal!

Chicken Roll-Up Dinner


Ingredients
4 Large Boneless Skinless Chicken Breasts, pounded to an even thinness

1 1/2 Cups Mashed Potatoes (I used instant, but this would be a great way to use leftovers)
3 Cups Steamed Broccoli, finely chopped
1/2 Cup Shredded Cheddar Cheese (I used reduced fat.  See?  Healthy!)

1/2 Cup All Purpose Flour

1/4 tsp Salt
1/4 tsp Pepper
1 Egg, beaten
1 1/2 Cups Panko (found in the Asian and/or baking aisle)
1 1/2 Tbs Ranch Dressing Seasoning Mix (found in the dressing aisle)
10 oz can Cream of Chicken Soup
1 Cup Milk


Directions
Preheat oven to 350 degrees F.

Mix flour, salt and pepper in a shallow bowl, place beaten egg in a second shallow bowl and mix panko and ranch seasoning into a third shallow bowl.  My bowls are absolutely not shallow so I had to use plates for the dry ingredients.


Pound chicken breasts relatively thin and spread a thin layer of mashed potatoes over each, then a layer of broccoli, followed by a layer of cheddar cheese.


Carefully roll each chicken breast, securing ends with a  toothpick.


Coat rolled chicken in flour, then egg, then panko mix and place on a baking sheet that's been sprayed with cooking spray or is lined with silpat.  You're going to have some spillage.  I just threw the spillage back into the ends of one of the rolled chicken (making sure it was coated in panko of course). 


Bake for 30 - 35 minutes or until chicken is cooked through (try to actually push start on the timer, unlike I did...).  Let rest for 10 minutes before eating.

In the meantime, heat cream of chicken soup, milk and about 1 Cup of broccoli in a small saucepan until warm.  Spoon the sauce over chicken rolls and serve!

Woops!  I forgot to take a pic with the sauce, but you get the *picture*.

Tuesday, September 28, 2010

DVF steals

Over the past few weeks I've gotten some great deals on random DVF stuff. 

With the release of the latest Kindle, cases for the second generation dropped.  I had been eyeing a DVF case for a while, but couldn't justify the price tag when I already have a nice Cole Haan case.  I'm not gonna lie, I still kind of want this case, but I love Spotted Kat Kasi Canvas Clutch for Kindle that I ended up with.  It had always been my second choice, it's lightweight, slim, fun, (pink on the inside!), it holds my kindle much more securely than my old case, and now it's pretty cheap!


My other DVF steals came along when I was innocently walking down a side street in Alexandria and came upon a sidewalk sale at The Shoe Hive.  Unable to resist the lure of something so glorious, I forced Kota to do a little browsing with me when I saw them....  Sandals with a toe loop AND peacock feathers.  They didn't have my normal size, but when I tried half a size down they fit just fine so I took home Diane Von Furstenberg's Dahlia Feathered Flat Sandals for a $150 savings.


I also grabbed a pair of Diane Von Furstenberg's Haven Flats saving $175.  I don't love them quite as much as my other purchases (they show toe cleavage so there's promise!), but I also haven't broken from wearing sandals yet so they have been untested so far.


Monday, September 27, 2010

Chicken and Snow Pea Stir Fry

I've noticed that when I cook, I tend to choose recipes with a decidedly Asian flair.  Well, here's another!

Chicken and Snow Pea Stir Fry


Ingredients
2 Tbs Soy Sauce
1 Tbs Hoisin Sauce
1 tsp rice vinegar
1 tsp Corn Starch
1/2 tsp chili garlic paste
1 Tbs Brown Sugar
1 Tbs Olive Oil
1 Lbs Chicken breast, cut into bite sized cubes
1-2 Tbs Ginger, minced


Directions
Combine the soy sauce, corn starch, brown sugar, hoisin sauce, rice vinegar, and chili garlic paste in a small bowl.  Whisk until smooth.


Prepare Rice Noodles according to directions.  Try to time it so they are fresh when stir fry is done.

Heat oil a large skillet over medium heat. Add the chicken, ginger, and garlic, and stir fry until the chicken is cooked through.


Add the snow peas and sliced onion, and continue to stir fry until the vegetables are slightly tender.


Add the sauce to the skillet and continue to cook for a minute or two, until slightly thickened.


This dish has been Leftovers Approved!

Monday, September 13, 2010

Three Basil Pesto

Eric asked me to try this week's recipe.  It had to be altered quite a bit due to availability of ingredients and laziness (I didn't want to go to the store).

For your convenience, here is the original recipe.

I ran into a few problems here:  pine nuts are really expensive right now, I didn't have Pecorino Romano cheese, I only had two cups worth of Parmigiano-Reggiano cheese, I didn't have Bush Basil or Parsley.  I ended up making some substitutions and halving the recipe.  I used the three types of basil I have growing in my garden.  I also assumed Sweet Basil is the same as Italian Basil so I used mostly that.  Here's what I ended up with:

Three Basil Pesto
Three Basil Pesto on a bed of spaghetti with chicken and homegrown eggplant.

Ingredients
2 Garlic Cloves
1/2 Cup Walnuts (not chopped yet)
2 cups Parmigiano-Reggiano Cheese, grated
2 1/2 cups 3 types of FRESH Basil Leaves.  Mine worked out something like this
      1 1/4 Cups Sweet Basil Leaves
      3/4 Cups African Blue Basil Leaves
      1/2 Cup Lemon Basil Leaves
2 1/2 Tbs Olive Oil
1 tsp Black Pepper
Splash of Lemon juice

More basil than I thought necessary (along with the rest of the ingredients in the back) turned out to be just enough to half the recipe.  Picking the basil took forever.

Directions
Pulse garlic in a food processor until finely chopped, then add nuts, cheeses, a large handful of herbs and pepper and process until chopped.  Add remaining basil one handful at a time, pulsing after each addition until finely chopped.  With motor running, add oil and blend until incorporated.


I put the end result over spaghetti, grilled chicken (with truffle salt!) and eggplants I had picked from the garden a few days before.

Notes:
  • It was tasting too cheesy for me (I never thought I'd say that), so I added a splash of lemon juice.  Eric thought I could have added more nuts instead, but the lemon juice turned out well.
  • For a smoother texture, make the pesto in a blender.  Make sure to scrape down sides frequently.
  • Pesto can keep for a bit in the fridge, but it will brown (yes, even with lemon juice) so be sure to cover the surface.  It can be kept frozen for a few months as well, again, make sure to press out excess air in sealed plastic bags.

Friday, September 10, 2010

The Truffle Shuffle

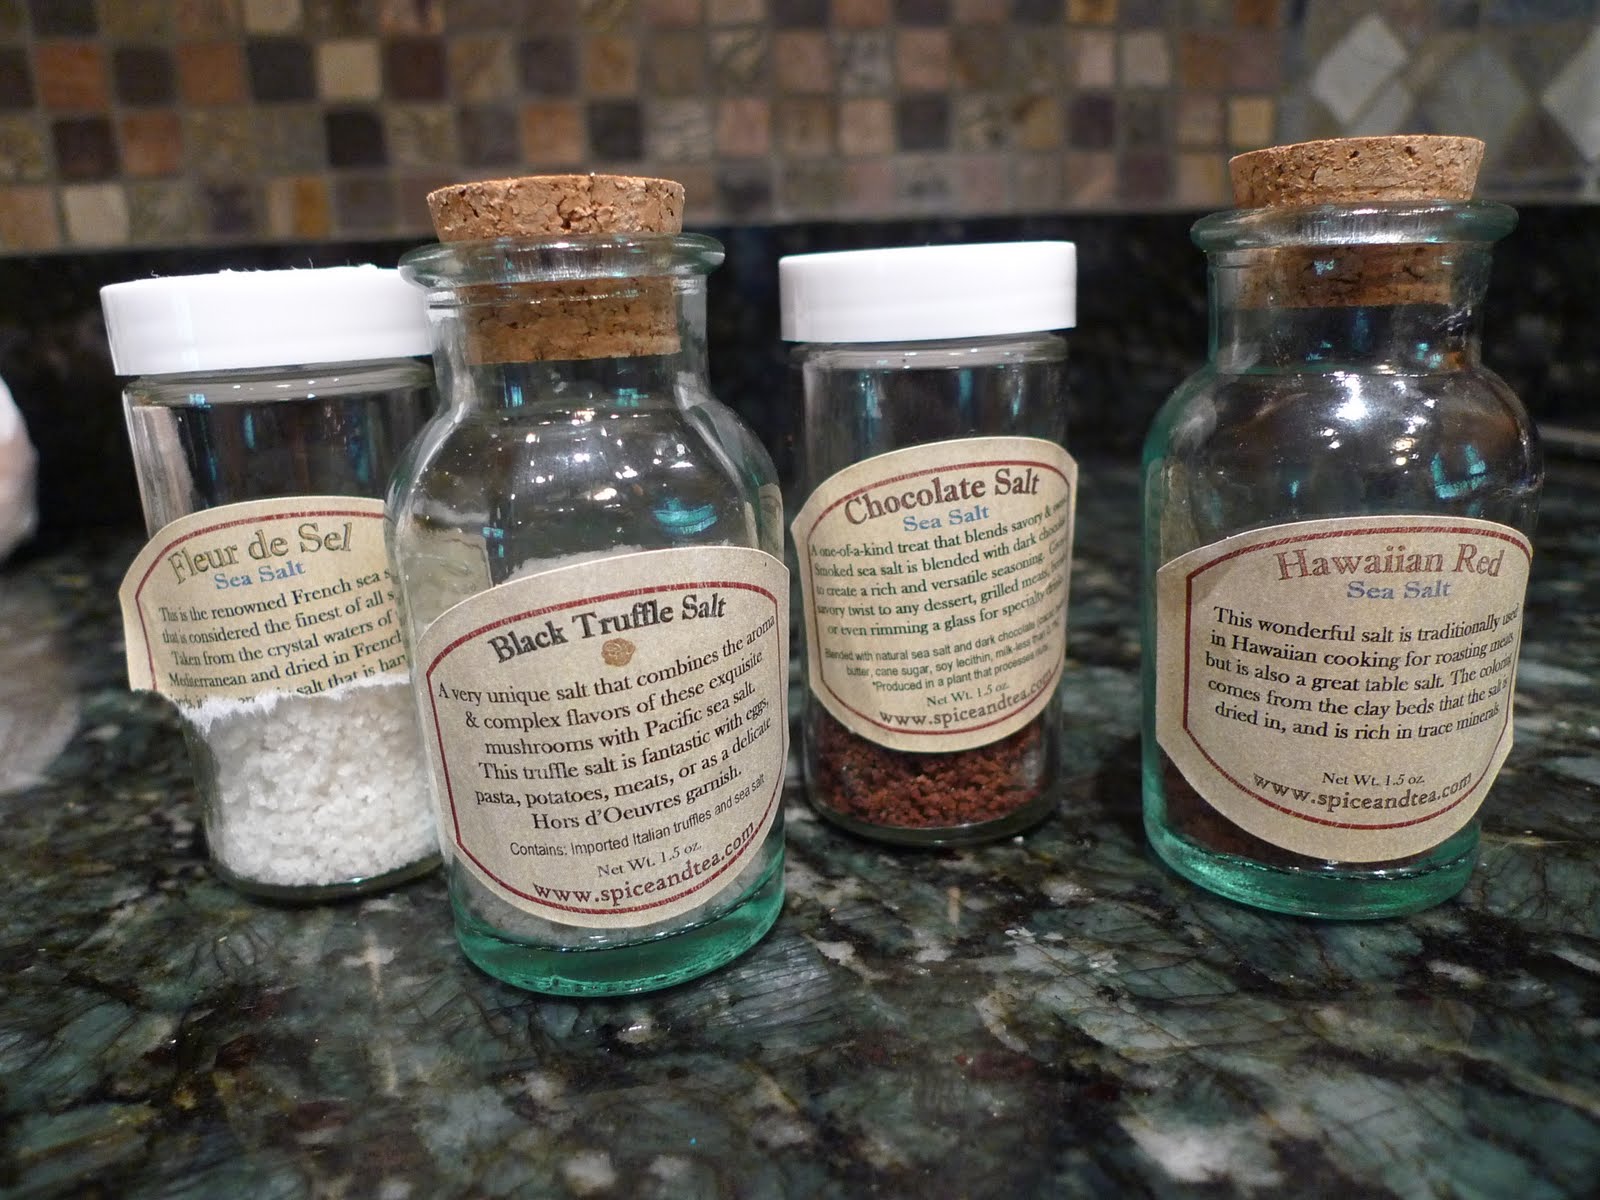
This week I've altered my breakfast routine.  Well, a very small part of it, but this is a big deal folks.  It started when I was finally able to visit the Old Town Tea and Spice shop last weekend and picked up a few choice items.


Raspberry Infused Sugar
Fleur de Sel
Chocolate Salt
Hawaiian Red Salt
And last, but absolutely not least, the jewel of my small salt collection:  Black Truffle Salt.

If I'm gonna be honest, I haven't used any of them but the Black Truffle Salt and I'm having a hard time making myself stray, it's just that amazing.  The truffle smell that gets released when you open the jar is strong, but so delicious.  I don't know how to describe the smell of truffles aside from...truffley?  Musky may work, but it doesn't quite capture it. 

Little black pieces of truffley goodness mixed in with the pacific sea salt.

Anyway, we've tried lightly sprinkled on chicken before it's grilled.  It adds a subtle flavor in the small quantity that really ups the anty on chicken.  Where I'm really loving it is on my eggs in place of my usual Lizano Salsa.  I'm going to have to force myself to switch things up every now and then.  I'll be sure to report back when I can tear myself away from the truffle salt long enough to try my other purchases.

LinkWithin

Related Posts with Thumbnails